- First you have to login in your Dashboard. For that enter this URL in your web browser https://appofox.com/booking/.
- Now you can see a window just like below image. This is a Member’s login area, you can make ID here.
- You can Login here by using your Gmail Id or you can create a new account. It is totally Up to you.
- After the Login process is done, you’re in the Dashboard panel. Here you can see all the upcoming options we’re going to describe.

Business Type
- Business type is divided into two separate parts – Individual and Business.
- If you’re running your business alone without any partner or staff member then choose Individual as your business type.
- If you have Staff members and want to assign services to them then choose Business as your business type. You can choose desired one and proceed further.

Service Type
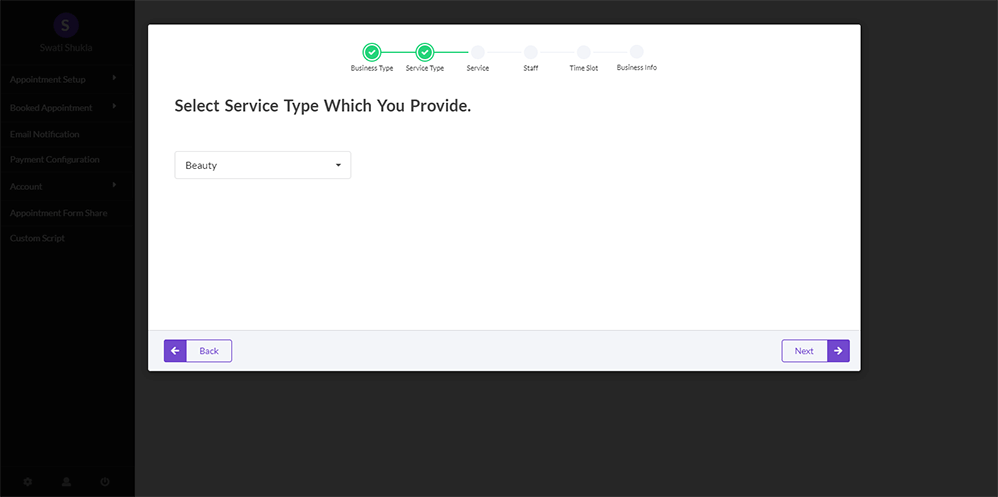
Service
- After selecting the Service type, add your services.
- You can add service category, service name, Duration and price.
- If you want to remove any particular service, click on the delete icon.

Staff
- You can add staff member’s here.
- Add Name, their email id, Phone number and assign particular service to them.
- While filling the form your customer can choose desired person for the service.

Time Slot
- Here you can add time management of your staff members. You can set the overall schedule of your staff and manage it easily.
- Adding Time schedule is very important. You can manage break time, holidays of your staff and also it will be easy for your customer to know about the service staff is available or not at a particular time and date.

- You can edit or update the date slot of working period for your staff members.
- Pick the Start date and End date for your staff members by clicking on the calendar and update it.

- When you hover your mouse on Day you’ll see Edit Time slot option, Click on it. Update the time & add rest time for your staff members.
- Set the On/Off day for staff. If you want to give holiday to individual staff member at a particular day, just click on setting icon and Choose Off day.
- You can remove any time slot using Delete option.

Business Info
- You can add all the details of your business. These details will be shown at your Form and make your customer easy to contact you or find you.

- After doing all the above process, your form is completed. You can see your form by click on the URL as shown in the image. You can also share this URL to your clients & customers for booking their appointments.
- If you want to Customize your form more or you want Iframe code to show your form at your Website then Click on “Continue”.

AppoFox Form
- This will be your Appointment form. This is a Basic version you can personalize it more from the Dashboard.

Add services
- To add more services in your business profile, Go to Dashboard > Appointment setup > Services.
- Click on “Add service” and choose category, enter Service title, Duration, Price, Capacity and Short description.
- Category – You can edit/Add the Category of your services which you’re providing to your clients.
- Service Title – Add the title for your Service.
- Duration – Add Time (in minutes) you needed for completing your service task.
- Price – Add the Payment amount you’ll charge for your particular service.
- Capacity – In capacity you can add the number of clients you’ll serve in particular time slot.
- Short Description – Add a brief introduction about your service you’re going to serve to your client.

Add Staff/Member
- To add more staff member’s for your services, Go to Dashboard > Appointment setup > Staff/Members.
- Click on “Add staff” and assign services, enter Name, Email, Mobile and description.

Add Availability ( Date/Time )
- To edit Staff availability , Go to Dashboard > Appointment setup > Add Availability ( Date/Time )
- Here you can edit the Time slot according to your need.
- Date Slot – You can add the staff availability .

- To see how many appointments are booked, Go to your Appofox dashboard > Booked appointment.
- Here you can get all the details about your customer who have booked an appointment from your form.
- You will get details like Customer name, Service staff name, Service, Duration and payment.

This option allow you to set the Email notification setting.
- Admin Email Notification – You can set “To” which email id admin want to send mail and “From” which email id admin want to receive mail. For sending the customer details with your email you should put the shortcode in the message body and you can write any message too. You can also send the cancel email to the customer.
- Customer Email Notification – You can set “From” which email id you want to send email to user after form submitting. You should put the shortcode in the message body and you can write any message too. You’ll also add the cancel message if the customer cancel its appointment.
- Shortcodes are given below the Email text area. Just copy them in add them with your email text.

- You can configure the payment gateway through which you want to receive payment after appointment booking is done.
- You can choose Paypal or Paytm which is suitable for you. Just enable them and fill the details. This will activate payment mode on your site.
- By default Point of sale option is active.

- This panel gives you the freedom to customize your appointment form. Design your form as you want.
- You can add background image, sidebar background image and upload logo for your business.
- For uploading image just click on choose file option and pick image for your files.
- You can also add Color and Overlay color in your images. Pick color from the color bar and set the transparency.

- In localization setting you can Date format, Time format, Time zone and currency.
- Date Format – Two date formats are available DD/MM/YYYY and MM/DD/YYYY. D stands for Date, M is for month and Y is for Year.
- Time Format – You can choose your time format as 12:00 or 24:00
- Time Zone – Using time zone you can set the local times according the place you belongs. Choose it from the given options
- Currency – Pick the desired currency in which you want to get your payments.

- Here you can set the details you want to receive from the customer during the appointment.
- You can set both for With Login and Without login. Just Check the box.

- Here you can set the time schedule for your leads.
You can add the Minimum time for advance notice required to book an appointment.
You can add the Minimum notice time required for cancelling an appointment.
Also add the days in which advance booking can be done.

- Now you have completed all the required information. Your form is ready to use. 😀
- You can add your form your website by using the Embed code. Copy the code and put it on your website where you want to display your form.
- Or you can directly share your form to your customer using URL. Copy the URL and share it.
